Altering some advanced features may cause BIOS settings to get corrupted suddenly. Restoring the system to its default settings frequently resolves system instability caused by poor overclocking or the inclusion of incompatible hardware components.
How to Reset BIOS Password: Step-by-Step Guide
5 Simple Ways to Reset Your Computer BIOS—Will Surprise You!
If a user has access to the BIOS interface, they should look for signs such as Load Optimised Defaults or similar ones. But if the display is blank or the first solution doesn’t work, you must clear the CMOS. This entails pressing the CLEAR CMOS button, replacing the CMOS battery, or connecting a jumper to the RTC pins and shorting them.
How to Reset Computer BIOS
After working on various systems, our team has seen changes in the placement of the CMOS battery, the transparent CMOS button, and even the number of RTC pins. Although the fundamental concept of resetting the BIOS remains the same, the precise procedure can vary depending on the motherboard.
Via UEFI/BIOS Utility
You should start by trying to access the UEFI/Legacy BIOS Utility. When the splash screen appears on your PC, simply press Del, F2, or the relevant key. The specialized one should typically be visible directly beneath the manufacturer’s emblem in most systems.
There are two ways to fast reset the motherboard’s firmware once you’ve accessed the BIOS interface. Here is a quick summary of the first approach:
Change to the Advanced Mode first. To do this, use a special key (such as F6 or F7).
to the Save & Exit or Exit tab. Depending on the motherboard manufacturer, this varies.
Pick one of the following options: Load UEFI defaults, Load optimised defaults, Restore defaults, or a comparable option.
You should receive a confirmation dialogue box. Press OK or Yes as directed.
Most users simply shut off the BIOS, which will erase the modifications. You must save and quit instead. Simply select the relevant choice from the same tab by pressing the designated shortcut key.
Another request for confirmation should appear. Examine the settings that will be restored. Then click OK or Yes.
The second way, which is simpler than the aforementioned procedures, includes using a straight shortcut key to load the optimized settings. This makes the procedure of resetting the BIOS simple.
However, the dedicated key changes for Legacy users as well as for each model of the motherboard. Even some manufacturers have incorporated this into EZ mode. When you choose the appropriate choice, the identical dialogue box that was previously explained will appear.
Press the Clear CMOS Button
The UEFI software makes it simple to reset the BIOS. But what if your computer can’t even start up to the BIOS? Clearing the CMOS (Complementary Metal Oxide Semiconductor) values should be sufficient in these circumstances.
All of the low-level configurations that turn on the motherboard and initiate the POST (Power On Self Test) are stored in the specialized NVRAM or RTC RAM chip. The chip loses its saved BIOS configuration when you click the dedicated CLEAR CMOS button because the power supply is briefly interrupted.
The motherboard might affect where the button is located. It was on the I/O shield when I tried to wipe the CMOS on Gigabyte’s TRX40 AORUS MASTER. However, it was found on ASRock’s X570 AQUA as a “smart” switch.
Find the CLEAR CMOS button first while keeping the above in mind. Look in the user manual to see if it is located on the mainboard itself if you cannot find it with the other I/O ports.
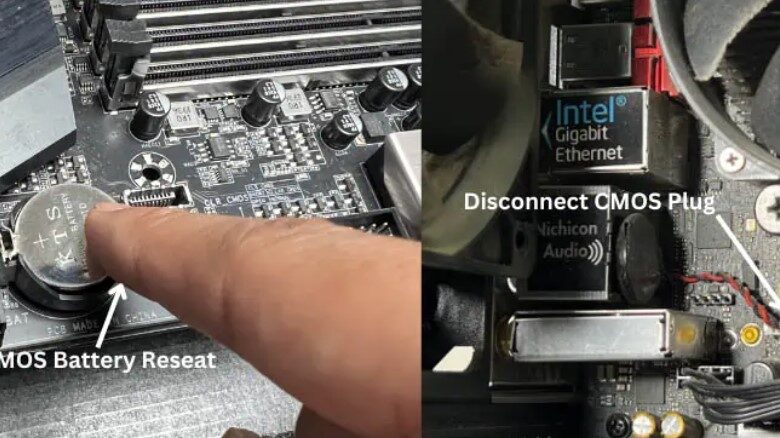
Reseat CMOS Battery
Only more recent motherboards (both high-end and mid-range) feature the CLEAR CMOS button. If you’re using an outdated system, you might not be able to find it. If so, you might want to remove and reseat the CMOS battery.
Well, this is still the method that most specialists like to use to reset the BIOS. In fact, if your laptop has an on-board 3V battery, this method also works with the majority of them.
In contrast to the physical CMOS clear switch, the coin-shaped cell is located on the mainboard and must be accessed. Depending on the manufacturer and the form format of the motherboard, the precise placement varies.
For instance, the CMOS battery is vertically installed with a dedicated connection that mates with the specific header on our Fatal1ty AB350 Gaming-ITX board. So, rather than deleting it, we can just unplug it for a while, which will reset the system’s parameters.
Determine the battery’s kind and position to start. Consult your user manual for assistance if necessary.
Make careful you turn off your computer and unplug the power supply.
Before touching the motherboard, it’s a good idea to ground yourself. Use an anti-static wrist wrap if you have one, or keep contacting a grounded metal surface the entire time.
Now you can access your mainboard by opening the PC casing. The cell should come out of its compartment once you push the designated metal clip/lock.
As advised by the manufacturer, give it 15 to 60 minutes before reseating the battery. As there will be no power source at this point, the BIOS chip won’t be able to maintain the configuration.
The next time you boot up, factory settings should be loaded since it has lost the previously saved values.
Don’t forget to load the optimized defaults and save changes before quitting the BIOS once you’ve managed to do so.


